Showing posts with label Plant Rescue. Show all posts

Wednesday, April 11, 2012

Plant Rescue 106 - Leeks

      A couple of days ago I was looking to get some dirt from the park compost pile to mix with mushroom soil to make a new planting container.  There used to be a sieve over by the compost piles, so I began a quest to find it by looking along the edge of the woods by the piles.  But I found something even better:

A beautiful clump of Leeks
More leeks a few feet away,  4/10/2012

      Yesterday I took my shovel to the park and dug up the leeks.  Dug too closely to the clumps and cut off the roots of three leeks, which allowed me to have one of them for lunch diced into my cottage cheese.  Makes cottage cheese pretty good stuff.


     The picture above shows the leeks after they were dug up.  The one on the right ended up being one of the kitchen leeks, as I severed nearly all of the roots.  That left eight leeks that I trimmed both the roots and the tops, as I have read that is the proper procedure for transplanting leeks.  You need to cut the roots to get the leeks back into the new hole, and you need to trim the tops to slow the needed uptake of water as the leeks regenerate their roots.


      I used these new leeks to add a top and bottom row to the single pre-existing row of leeks.  Using a mallet and a pointed post, I made holes about four to six inches deep.  You put the leek in the hole, but do not back fill dirt around the leek.  Just water well.  Rains will cause the dirt to fill in around the leek, while allowing room for the girth to increase as the leek gets bigger.  Planting them six inches deep will result in nice long blanched stems when they are harvested sometime next winter into spring.
      Yes, I did find the sieve while searching along the woods, but this leek plant rescue was more important than making new dirt.  Today is another day.

Tuesday, March 20, 2012

Plant Rescue 103B - Onions

Overwintered onions,  3/19/2012
      My post about onions on March 14th did not contain pictures about cleaning up the onions that overwintered.  There were bulbs from the porch that had started to sprout, and bulbs from both gardens that are starting to regrow.  When they regrow, they send up multiple new plants which should be separated and replanted.  I hope the new shoots make good bulbs, or this activity is a waste of time.  In this picture above, you can see the new growth starting on two of these onions.  I have already started to peel the shiny one.


      Layer after layer needs to be peeled back until you get to individual plantlets.  This onion is nice because it is still mostly firm.  Some in the ground can be pretty mushy and yucky, thus a mess to tear apart.

Onions to replant, 3/19/2012
      Those two onions resulted in this total of eight stems to replant.  I have not found any literature on this topic of regrowth.  Will the newly planted onions think they are two years old, and thus try to go to seed before they form bulbs?  Any thoughts here?

Wednesday, March 14, 2012

Plant Rescue 103A - Onions

Onion Bed,  3/12/2012
      Last fall I replanted the onions from the summer harvest that were too small or too soft to want to keep.  Over the winter, many of them split into multiple stems, like the largest onion clump in this picture.  The red and white onions have split much more than the yellow onions.  I dug up the multiple onions:


      Then carefully pulled them or cut them apart to individual stems.  Often the outside of the onion was very soft and mushy, and had to be pulled off and composted.  This is the collection of cleaned up stems:


      These would have made nice green onions to eat, but I wanted to put them back in the ground.  I trimmed off a lot of the roots, leaving about an inch.  Tops were not trimmed, but probably could have been as the other gardeners who buy onion slips to plant receive them with trimmed tops.

Separated and replanted onions,  3/12/2012
      This is my first attempt at dividing and replanting onions, garlic, and shallots.  Anybody have any experience or expectations as to what will happen?

Monday, March 12, 2012

Plant Rescue 102A - Malabar Spinach Update

Malabar Spinach,  3/12/2012
      Early in January, I posted a blog about some malabar spinach cuttings:


Two out of three of the plants from the compost pile rescue rotted at the roots.  Before those plants were completely dead, I had taken cuttings to try to save at least some malabar for planting this year.  Here is a shot of the one lone survivor from the compost pile:

Malabar spinach,  3/12/2012
      This plant never dropped the little flowers it had from last fall, instead they developed into these little seed clumps.  I should pick off these clumps and dry them.  Maybe I have viable seed in addition to the actual vine!


The cuttings shown in the first picture have been growing in this little plastic container.  It works great inverted, as the bottom lets in much more light than the top.  I should wean the cuttings away from such high humidity, as they have obviously rooted.  Here are some other cuttings from 12/6/11 that I have not even potted up yet. So barring some disaster with these young plants, I will have malabar spinach thriving in those hot, humid yucky days of the middle summer.  Who knows, I may even trim up the plant with berries to make some more root cuttings.  At least I would not have to baby them over the winter.

Cuttings still to pot,  3/12/2012

Wednesday, March 7, 2012

Plant Rescue 103 - Onions

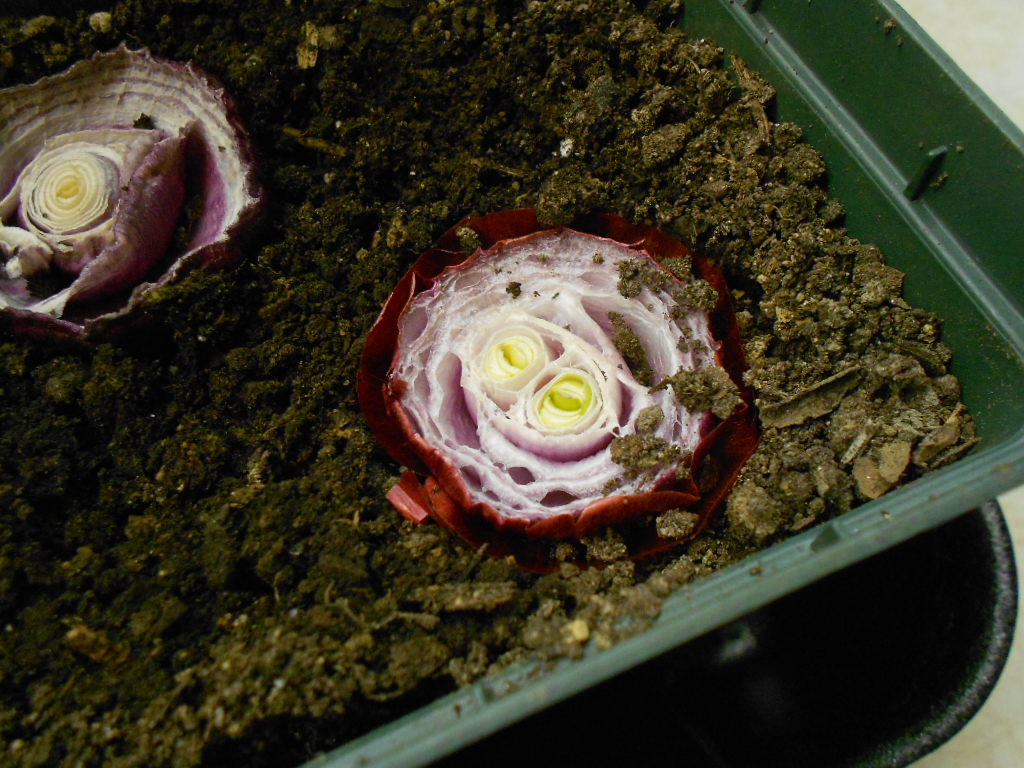
      In one of my many information seeking trips on the internet, I came across a very interesting reference about regrowing onions using the bottom rooty part of the discarded onion.  Talk about recycling.  Well I just had to try that neat idea.  The biggest problem is to remember to save that bottom piece instead of throwing it into the compost bin.

Onion pieces planted,  2/26/2012


Onions regrowing,  3/7/2012
      So cut off the bottom piece of the onion that contains the ring of little nubby roots.  I sliced about 1/2 inch off the bottom.  Indent that piece into damp soil, not wet.  Leave the cut side above ground level to avoid rot.  Water as needed to keep moist.......Wow.  That was pretty easy.  And exciting.  One of the cuts is even going to make two new onion plants.  I will separate that to two plants.  Talk about a perpetual growing machine!  I am going to put them outside soon, as onions can certainly take this weather.

Saturday, March 3, 2012

Plant Rescue 104 - Beets

      Last year on December 31st, I wrote a blog that included an experiment to see if I could rescue some old beet plants discarded at the park:

  http://fromseedtoscrumptious.blogspot.com/2011/12/plant-rescue-101.html

Here is a shot of the beet plugs that I planted in cell packs on that last day of the year:

Beet plugs,  12/31/2011
      All of the plugs are still green as of now, and some I have already planted in the ground.  This batch is about to go into the ground to free up some porch space:

Beet cell pack,  3/3/2012
Roots coming out of the pack,  3/3/2012

      Yes indeedee, the beet plug has developed nice roots.  It is ready to go into the garden.  I guess I will put them into a cold frame, though I suspect they would be fine now unprotected.  The question is whether these plugs will develop into beets, or just go to seed thinking it is their second year of growth.  That would still produce edible beet tops much earlier than I could get from a new seeding.

Monday, February 20, 2012

Plant Rescue 105 - Chinese Cabbage

      Back in November after the harvest of The Chinese Cabbage, it was my thought that that plant had gone to plant heaven, never to be heard from again.  And you were hoping the saga was over, too.

Chinese Cabbage, 11/23/2012
      This magnificent plant had grown as a volunteer, and I constantly feared for its life against the appetite of deer or rabbits.  But it survived, only to be mowed down by my blade for the Thanksgiving harvest.

Picked for Thanksgiving, 2011
      End of story, right?  Wrong.  There still was a stump, promising all sorts of possible rescue plans:


      I cut off all the little leaflets except the one shown in the middle of this shot.  Put the rest of those leaf thingies in my compost:


      Where they promptly rotted from too much moisture.  End of story, right?  Not so fast.  The old root with the one attached leaflet went back into a pot.  And did well:

Coming back strong, 12/28/2011
      I have some chinese cabbage started now from purchased seed, so I should let this poor survivor alone to live out its life and produce seed.  As it is trying to do:

Still growing, 2/17/2012

      Or I could cut it back another time and use these leaves for a salad.  It has a nice seed head forming, yet the cole crops are notorious for cross pollinating, meaning I might not get chinese cabbage from the seed.  Maybe I will cut it up for trying to clone some of the pieces.  Yes, that might extend its life a little bit more. Long live the Chinese Cabbage.

Saturday, January 7, 2012

Plant Rescue 102 - Malabar Spinach

Basella alba

From Wikipedia, the free encyclopedia
       Basella alba, or Malabar spinach (also Phooi leaf, Red vine spinach, Creeping spinach, Climbing spinach) is a perennial vine found in the tropics where it is widely used as a leaf vegetable.
       Basella alba grows well under full sunlight in hot, humid climates and in areas lower than 500 m above sea level. Growth is slow in low temperatures resulting in low yields. Flowering is induced during the short-day months of November to February. It grows best in sandy loam soils rich in organic matter with pH ranging from 5.5 to 8.0.
        Typical of leaf vegetables, Malabar spinach is high in vitamin A, vitamin C, iron, and calcium. It is low in calories by volume, but high in protein per calorie. The succulent mucilage is a particularly rich source of soluble fiber. Among many other possibilities, Malabar spinach may be used to thicken soups or stir-fries with garlic and chili peppers.
      Thank you Wikipedia.  So why am I writing about a vine that loves to grow in stinking, hot weather here in early January.  Because it likes to grow in stinking, hot weather.  In the nineties with high humidity, the stuff will grow a foot a day.  When your beautiful lettuce crop is only a figment of your imagination, this stuff is producing lush green leaves that can be eaten raw in a salad, or cooked in various ways.  Unlike New Zealand Spinach which didn't entice (that's being nice) me at all, this stuff is actually quite tasty.  And attractive, especially the Rubra or red stem variety.
      Now for the downside.  Although you can buy the seeds through catalogs, you will hardly ever see them on a seed rack at a nursery.  Ask a sales person about Malabar Spinach and they will give you a blank stare.  I have never seen Malabar as a live starter plant at a nursery.  Last year I talked to another gardener who had Malabar seeds on hand, so I "borrowed" eighteen seeds to plant.  Put them in their cell packs, watered them, talked to them, kept them warm.  Nary a one sprouted.  It has never been easy for me to start.
      So imagine my utter delight last September when I spotted some Rubra Malabar growing on top of one of the compost piles in the park:

Whoopee, Malabar Spinach,  9/7/11
      There were several plants in different places, and yes, I greedily took them all.  But now, how do you keep these heat loving machines alive till next June when they will thrive?  Any which way you can.
      Ah, I have digressed.  Wandered far from my title of Plant Rescue 102.  One of the vines I had pulled from the pile in September did not take well to upheaval, and was rotting at the base by December:

Not looking so well,  12/18/11
Where be his roots?
     So with nothing to do just a week before Christmas (ha, ha), I hacked this failing vine into little pieces, each with a leaf or seed stalk node:


      Having learned my lesson from previous failures with my cloning adventures using garden soil, I was a good boy and purchased a bag of seed starter soil.  And searched the garage for the Rootone that I vaguely remembered from maybe twenty years ago.  Searched the web, found out that the Rootone was probably still good.  So I dabbed it on the cuts, and planted the pieces in the seed starter soil on 12/18/11:

Malabar cuttings,  12/18/11
      Which finally brings us back around to this morning.  The cuttings have rooted well and are starting to sprout.  In the future, I will try to start the cuttings directly in cell packs, to avoid the next step of having to pot these up.  But for this try, I wanted to be able to watch the root development.

New growth,  1/7/12

Great root development, 1/7/12
      So I will pot these this morning, and then try to keep them happy for a few months till it warms up.  Maybe they can go in a cold frame in April.  But so far, a good start to Plant Rescue - Malabar style.


Saturday, December 31, 2011

Plant Rescue 101

      The cloning experiments written about earlier were mostly failures.  Those folks who suggested compost would hold too much water were absolutely correct.  Most stuff turned to mush, yet the good news is that the compost is still usable.  None of the pieces of thick stem chinese mustard rooted.  Even the stem of savoy cabbage expired, though probably aided greatly in death by sap sucking aphids.
      On the positive side, cuttings of Malabar Spinach have rooted, and some of those were repotted today.  New to plant rescue today were four mustard plants dug from a common path at the park:

Rescued and transplanted mustard greens, 12/31/11

Who can name it greens?    12/28/11
      These greens were growing at the park in a dump area where gardeners throw their weeds and discarded plants.  Interesting volunteers can often be found in such spots.  These little greens hopefully are a cos lettuce, but the little striations on the leaves leads me to think they are probably a chicory, much less exciting in my opinion.  But they were put in cell packs anyway, so as to develop a good root system before being planted in a cold frame:

Cos or chicory?
       There was a nice little bunch of beet volunteers growing in this spoils area.  Upon closer inspection, they were leafed out from beets that were partially eaten by voles rather than being beets from seed.  They still might grow on to provide beet tops in the early spring.  Which would be a great freebee.

Sprouting beets, 12/28/11

Rescued beets, 12/31/11

      Note particularly the two beets on the right that have been chewed on by voles.  Yet the beets are trying to regrow.  Next I timmed them up a bit:

Beet plugs for potting, 12/31/11
      These trimmed up beet plugs were potted in cell packs, and will move on to the cool porch to get some strong roots started.  Then they will go in a cold frame.  But don't give up on the beets.  They were repotted in good garden soil to see if they will start even more sprouts.  I just find it fun to see what will happen.

Beet roots repotted, 12/31/11