If you have read many of my previous posts, you know one of my top garden rules is CHEAP. In my opinion, a big benefit of home gardening is saving money. Most of my accessories are therefore home made. Why should garden labels be any different? Cheaper means better, but only if effective. I thought I was onto something last year using aluminum strips cut from lasagna pans, but in the end, the strips were too flimsy and would blow away easily. Magic marker would fade within weeks.
Never one to quit trying, the plentiful plastic bottle was next on the agenda. Turns out, it works great. Let's go through the steps for free labels, well at least for the cost of the pens.
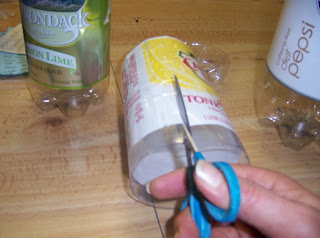
Start with an unending supply of one or two liter clear plastic bottles. Use the labels BEFORE you take them off to help with keeping your cutting lines straight.
Use a single edge razor blade to start a cut about one inch long against the label. This cut must go through the plastic, as it is a starter cut to insert the scissors in the next step.
Insert small scissors in the razor blade cut, and cut all along the label, removing the top in a nice straight line. Repeat this procedure at the bottom of the bottle, either along the label, or a seam to help you keep the cut straight.
Use your scissors to cut this sleeve to open it, using some line on the label or a seam to help you with a straight cut. The plastic will try to curl after the cut, but will be fine as you cut narrow strips. Remove the label now. If you cut a lot of strips, you can use the part with the old glue, recycle those strips, or try to soak off the small bit of label. Putting those strips into recycling works for me.
This is the fun one. You have to be extra specially nice to your spouse to borrow their amazing craft store cutter gizmo. Or do this when your extra special spouse is not home. Do a year's supply at that time. Anyway, the little roller blade allows one to cut off plastic strips at any desired width. Without this handy gismo, scissors would be the safest way to cut the plastic into strips.
Magic Marker fades quite rapidly when used on the plastic strips. I found a PAINT pen last year and tried that. The blue one, with a fat tip. Worked well, but the tip was wide and made it hard to write. Well my wife asked, "Why don't you use the fine point?" Duh, didn't know there was a fine point. The dear lady bought me two Sharpie Fine Points! Two glorious Paint Pens. Next, read the directions on the pen. Repeat eight times. Have plenty of time on your hands to read the directions again. Once you get it going, it is quite easy to get easily readable labels. The black krim label seen here is from last year, having made it through the whole long, hot summer. The last step is to take a single hole punch to make a hole in the end of the label. If you look very closely, you can see the hole in this label just above the black cap of the Sharpie pen. Now you can put the labels in your starter flats, in the ground, or attach them to stakes or trellises with twine or reused twisties. Works great for me. And did I say it is really cheap? But I guess I shouldn't bother to look for garden label manufacturers as sponsors to my site.
Please be careful when using the razor blades and scissors. Try making these labels at your own risk. Even though my typing is horribly slow, it is not from the loss of fingers. I just choose to only use two of them. Garden on - George


Oh! Hadn't thought of a paint pen! Thanks! I bought some metal markers for my roses. The kind that are supposed to work with a fat pencil. Unfortunately, the pencil marks faded. I will definitely try again with a paint pen.
ReplyDeleteNice idea George, but since I can buy 100 purpose-made plant labels for about 99p I don't think I'll be trying your technique. Interesting to see that your wife is a crafter though (at least I assume so, from the presence of the Sharpie pens and the guillotine cutter). So is mine. She makes loads of greetings cards, birthday cards, christmas cards, etc.
ReplyDeleteI use label markers from milk (opaque COLOR) cartons or yogurt with a permanent marker. This works for our family. And you know what the other wonderful "other use" for those plastic bottles is: 1) putting around a young seedling to prevent cutworm damage, squirrel (I must hide my peanut damage), and (2)frost damage. I find personally that "The R--L Thing" works for me."
ReplyDeleteMark, my wife got her guillotine cutter to cut photographic paper. Though that works like a champ, so does going to the drug store for cheap digital prints. Her craft time is spent being a super Gramma, caring for three of our five grand children during the five day work week.
ReplyDeleteDawn, I have been thinking about putting some cut off plastic bottles inside my cold frames as double insulation. Have not remembered to try that yet. George
I haѵе read sеverаl gοod stuff hеre.
ReplyDeleteCeгtаіnly worth bookmаrκіng
for reѵisitіng. I ωonder how muсh attempt you put
tο creаtе this kіnd of fаntаstic іnformativе site.
Feel free to visit my web-site - Terry Sawyer